WPC (Wood-Plastic Composite) deck flooring has gained immense popularity for its durability, low maintenance, and appealing aesthetics. It is a perfect choice for outdoor spaces like balconies, patios, and garden decks. Whether you’re a DIY enthusiast or a professional installer, learning how to install Deck Flooring can help you transform your outdoor area into a stylish and functional space.
This blog provides an easy-to-follow, step-by-step guide to installing composite WPC deck flooring, ensuring a professional finish. Let’s look into the materials, tools, and techniques required for the installation.
Materials and Tools You Need for Installing WPC Deck Flooring
Before you start the installation, gather all the necessary materials and tools to avoid interruptions during the process. Here’s a quick checklist:
Materials:
- WPC Deck Boards – Choose high-quality WPC boards in your desired size, color, and texture.
- Joists – Aluminum, wooden, or composite joists to create a strong foundation.
- Starter Clips and Fasteners – Clips hold the boards securely and maintain even spacing.
- Expansion Screws – Necessary for securing the joist frame.
- Skirting Boards (Optional) – To finish the deck edges neatly.
Tools:
- Measuring Tape – For accurate measurements.
- Chalk Line or Marker – To mark the deck layout and alignment.
- Cordless Drill/Screwdriver – To fix boards and joists.
- Saw – For trimming and cutting boards to size.
- Spirit Level – Ensures the surface remains level.
- Rubber Mallet – This is used to adjust the boards into position.
- Safety Gear – Gloves, safety goggles, and ear protection.
Steps to Install Composite Deck Flooring
Now that you have the required tools and materials, let’s move on to the installation process. Follow these steps carefully for a flawless WPC deck installation.
Step 1: Plan Your Deck Layout
Before any physical work, planning your deck layout is crucial. This step determines the success and efficiency of the installation.
- Measure the Space: Use a measuring tape to determine the length and width of the area where you plan to install WPC deck flooring.
- Sketch the Layout: Create a sketch with dimensions. Decide the board orientation (horizontal, vertical, or diagonal) and mark areas where the joists will go.
- Account for Gaps: WPC deck boards expand and contract with temperature changes. Leave a 5–10 mm gap between the boards and around the edges for expansion.
- Surface Inspection: Ensure the surface is even and free from debris. If installed over concrete, the base must be solid and dry. For ground installation, clear weeds, roots, and stones.
Step 2: Choose Boards and Fasteners
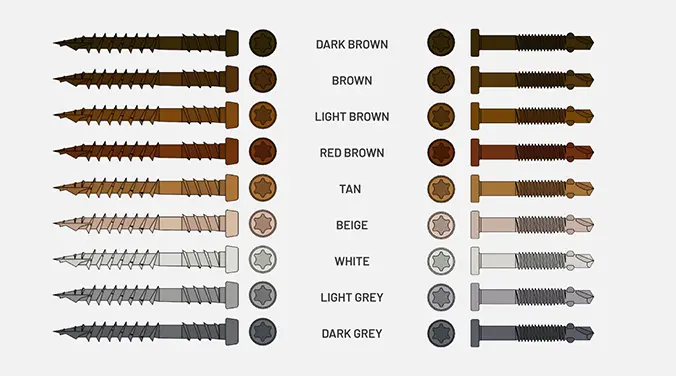
When selecting WPC deck boards, consider quality, aesthetics, and durability.
- WPC Boards: Select the type of WPC decking you want – hollow or solid boards. Solid boards are heavier and more robust, while hollow boards are lighter but require a sturdy base.
- Fasteners: Opt for hidden clips and fasteners for a cleaner look. Starter clips are necessary to secure the first and last boards in place. Choosing the right material ensures longevity and aesthetic appeal for your deck.
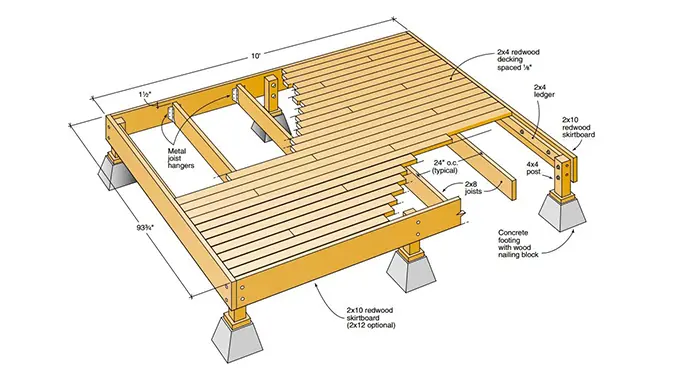
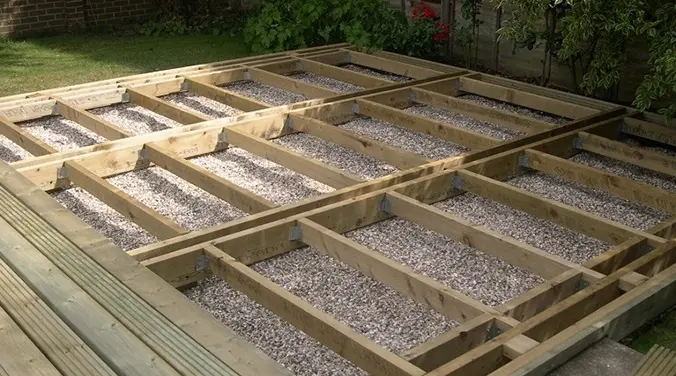
Step 3: Fixing Joist
The joist structure acts as the backbone of the deck, so this step requires careful execution.
- Mark Joist Placement: Mark lines on the surface using a chalk line to determine where the joists will sit. The spacing between joists should be approximately 300–400 mm (center-to-center) for optimal support.
- Install Joists: Use aluminum, wooden, or composite joists based on preference. Place the joists in parallel rows along the marked lines.
- Use expansion screws: to secure the joists to the base. If installing over concrete, drill pilot holes for proper fixing.
- Ensure Evenness: Check that all joists are level using a spirit level. Uneven joists can result in wobbly deck boards.
- Gaps for Drainage: Leave small gaps between joists to allow water drainage and ventilation.
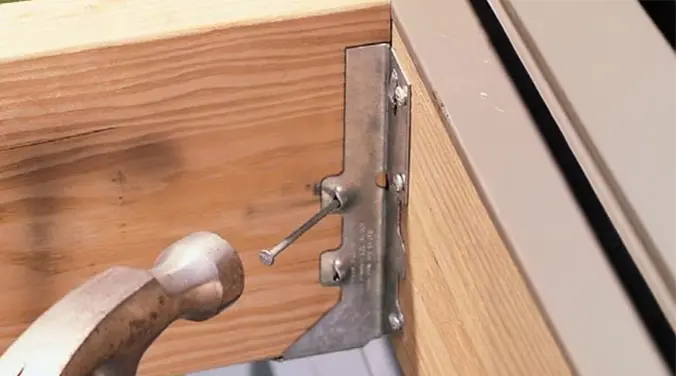
Step 4: Install the Deck Frame
Once the joists are fixed, the frame of the deck starts taking shape.
- Install Starter Clips: Attach starter clips along one edge of the frame. These clips hold the first deck board in place and ensure a straight starting point.
- Fix the First Board: Slide the first WPC board into the starter clips and secure it using screws.
- Secure the Remaining Frame: Double-check the alignment of the joist frame. Make adjustments if needed to ensure the structure is level and sturdy.
Step 5: Install the Remaining Boards
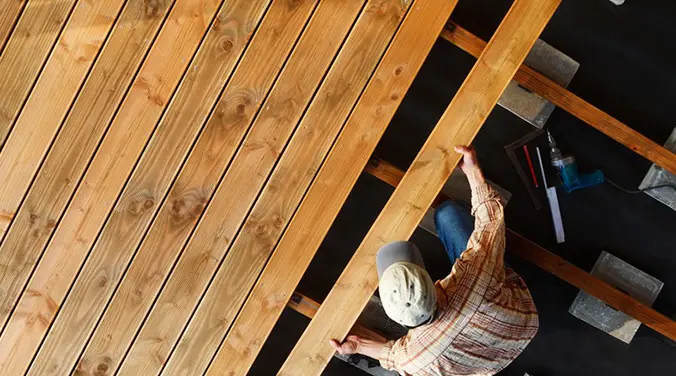
Now it’s time to install the WPC deck boards. Follow these steps for a clean and professional finish:
- Position the Second Board: Place the next deck board parallel to the first one. Use hidden fasteners to secure the board to the joists.
- Maintain Even Gaps: Use a spacer tool to maintain uniform gaps between boards for thermal expansion. This enhances the deck’s appearance and functionality.
- Secure Boards with Fasteners: Drive screws through the hidden fasteners into the joists using a cordless drill. This ensures the boards are firmly fixed without visible screws on the surface.
- Repeat the Process: Continue placing boards, securing them with fasteners, and maintaining even gaps until the entire area is covered.
- Tap Boards into Place: Use a rubber mallet to gently tap the boards into place if necessary.
Step 6: Trim Deck Boards
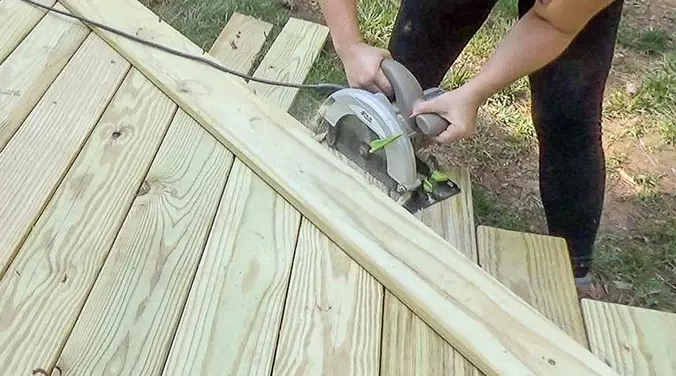
Once all the boards are installed, trim the edges for a neat finish.
- Mark Excess Boards: Use a chalk line to mark any excess parts of the deck boards extending beyond the frame.
- Trim with a Saw: Carefully cut the excess board length using a saw. Ensure the cuts are straight and clean.
- Add Skirting Boards (Optional): For a finished look, install skirting boards along the edges of the deck. These hide the joist structure and give the deck a polished appearance.
Step 7: Final Inspection and Cleaning
- Check Stability: Walk across the deck to ensure all boards are secure and the surface feels stable.
- Clean the Deck: Sweep the surface to remove dust and debris. You can also wipe it with a damp cloth to reveal the deck’s beauty.
- Enjoy Your New Deck: Once clean, your WPC deck flooring is ready for use. Add furniture, planters, or Outdoor Flooring décor to personalize your space.
Also Read: How to Install Wooden Flooring: A Complete Guide
Pro Tips for Installing WPC Deck Flooring
- Work in Good Weather: Install the deck on a dry day to prevent moisture interference.
- Use Quality Tools: Using high-quality tools ensures precision and saves time.
- Follow Manufacturer Guidelines: Always refer to the WPC manufacturer’s instructions for specific installation details.
- Maintenance Reminder: While WPC flooring is low-maintenance, clean it regularly to retain its charm.
Conclusion
Installing WPC deck flooring is a rewarding project that enhances your outdoor space with style and functionality. You can achieve a professional and durable finish by following the steps outlined in this guide—planning your layout, fixing joists, installing boards, and trimming edges.
WPC decking is not only easy to install but also offers long-term benefits like durability, resistance to weather, and minimal maintenance. Whether you’re hosting a backyard barbecue or relaxing with family, a well-installed WPC deck provides the perfect backdrop.
So, gather your tools, follow the steps, and transform your outdoor space into a stunning, functional deck!
For a free consultation, reach out at 91+9999500117 Or drop us an email at Info@lamiwood.in